Tuesday, January 10, 2012

Local Profile: UPAWS - Upper Peninsula Animal Welfare Shelter


Anyone who knows me knows it's no secret that I am slightly obsessed with my pets. They are my constant companions and favorite little subjects to photograph. Our company Facebook page probably has just as many photos posted of my little "fur-babies" as it does of us! One thing you may or may not know is that all of my little lover bugs are RESCUES! Yes, they came from a shelter not a pet store and they couldn't be more perfect in my eyes.


Another thing you may not realize is that the Marquette area is beyond blessed with one of the best no kill shelters many have ever seen, UPAWS! This shelter holds a special place in my heart because of the care and compassion they give each and everyone of the animals that pass through their doors, and believe me there are a lot of them. In August of this year the shelter took in 235 animals total, by September they had took in another 225. Because of the community UPAWS has built, they were able to find loving homes for all of them! Three of those little guys now belong to me! We adopted Cash in March and Simon and Rico (who happen to be brothers) in the end of October.

I am very happy to announce that Revisions Design Studio is currently working on a plan to sponsor a shelter pet every month from UPAWS! Besides, I am obsessively on their website checking the cute little mugs that go in and out of there everyday. I could go on forever about all the great things they do, but instead you should check them out yourself. Their website is well put together and updated daily. See the links below... you never know, you may find a best friend!

Website: www.upaws.org
Facebook Fan Page: UPAWS on Facebook


Monday, January 9, 2012

StylishHome - Home Makeover Handmade and Vintage Catalog


Yeah! StylishHome.com just released it's 2nd issue of their Home Makeover Catalog! In this you can find great ideas to spruce up your home for the new year. What I like most about this e-catalog is that they focus on handmade and vintage items. This way, your sure to create a space that is truly unique to you! The items in the e-catalog all link to the Etsy Shops where they can be purchased. It is also Kindle and Ipad compatible to make browsing a breeze! Best of all our Rococo Mirror from the UrbanAnalog Collection made the cut. Check it out on page 10.


Sunday, January 8, 2012

Before and After: Design Studio Renovation part II

The basement floor of our studio needed the most work out of the whole building. When we purchased this location, the building had been abandoned for over 14 years! We had broken windows and dead pigeons to deal with. Many others had passed on this location but we could see the potential it held. Also the price was right!

First order of business was having all of the utilities reconnected. There was no electrical service, gas meter, water meter or furnace. This actually played to our advantage because we were able to wire up the service we needed and update to more energy efficient appliances. We installed a high efficient furnace and hot water heater, replaced the toilets (there are 4 of them!) among several other things. Well, that was 3 years ago and we finally have been able to start making the "pretty" improvements! Last blog entry we showed you how we tacked the main studio space, this entry we approach the basement area.

BEFORE...


When we first moved in it was purely about function and getting things up and running fast. The asthetics came second. As mentioned in our last post, we moved our shipping and receiving area to the main floor so our ceramics operation could be moved down into the basement.


AFTER...


Painting both the floor and the walls really brightened up the space. In the first photo, you can see where our ceramics production takes place. The collapsible tables make it easy to adapt the space to suit our needs as they may change. Below to the left Janna makes a new batch of slip... to the right, Laurel is hard at work on the new and improved metals bench.

Friday, January 6, 2012

Before and After: Design Studio Renovation

It seems like every year around this time I get the bug to organize and change things up around my living space. This year it's the studio's turn to get a little facelift. I'm happy to report that 2011 was a great year for Revisions and we have decided to expand in a few areas of our operation. To do this, we really considered our options. Move to a different location and take on a whole new level of overhead expenses or put a little time and money into adapting our current location to suit our needs. After careful consideration, we decided that a move is in our future but probably not until the close of 2012. Luckily I LOVE a good renovation project! Our team dove head first into "re"envisioning our space and I think you'll enjoy seeing the results!

 1st floor BEFORE...
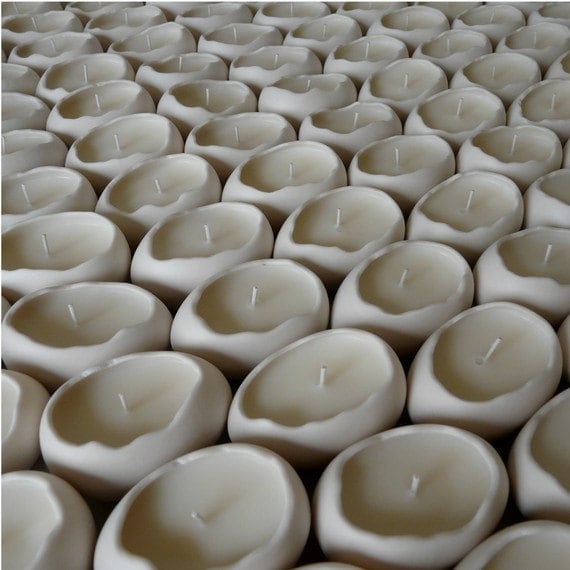
The first floor of the studio was dedicated to all of our ceramic production. This was very important during the "egg candle" rush of 2009-2010. During this time we were producing up to 1,000 units (sets of 6) of egg candles per month! Thats over 6,000 eggs all made by hand! To date Revisions has hand crafted over 30,000 porcelain egg candles! It was nice to have the square footage in this large and airy space, but the downside of having the ceramics in the main area is that we were constantly tracking clay dust up into our offices...


THE PLAN OF ATTACK...
As the ceramic production end of our business has transitioned into the manufacturing of several other goods besides the egg candles, we decided to move our shipping/receiving area up from the basement and to relocate the ceramics to the lower level. This way the majority of the mess will be contained in the basement along with our metal and woodworking areas. With a straight shot out the door, it will also make UPS and FED EX pickups much easier!


In progress...
First the walls got a fresh coat of bright white paint. Then Torrey got to work building our new shipping stations.
We mounted a countertop on the wall to create a sewing area. To the right are the component
parts we purchased at the hardware store to create some custom lighting over the area.
Michele created a custom wall plate to wire in the 3 pendant lights. This was a less expensive and easier option than moving the electric to the ceiling
                                                         
Michele also built custom shelving with some old barn wood we had on hand. The shipping stations were painted and put in place.

AFTER...
We now have a functional sewing area for making prototypes!!!

Sending out orders is a breeze with our new and improved shipping station!!!

Local Profile: Joe's Cakes

Revisions recently had a birthday to celebrate. Janna, our beloved studio Jane of all trades turned over another year on the calendar! Of course we took this as a wonderful excuse for us to indulge in a favorite Marquette guilty pleasure, Joe's Cakes!

After graduating from the Culinary Institute of America, owner and master cake artist Joe Heck worked in the demanding market of Manhattan for over 13 years before finally finding Marquette as his new home base. Located in the historic Landmark Inn, Joe creates custom cakes, pies and cheesecakes that are just as beautiful as they are delicious!

For Janna's birthday we enjoyed his delectable Chocolate Raspberry Bomb. Perfectly pared with a glass of Chardonnay, we had a lovely afternoon at the office... We can hardly wait for the next birthday!

Check out Joe's Cakes online and
become a Facebook Fan 


Wednesday, December 21, 2011

Ideas to Customize Your Wedding or Event!

As the new year approaches plans for celebration and new beginnings abound. Here at Revisions Design Studio, we can help make your special day even more lovely with just the right details.

Cake Toppers
In this picture, two of our porcelain love birds adorn the top of this beautiful wedding cake. This cute little accent can be found in our EcoElements shop. (set of 3 birds for $13.50)


Guest Favors

Perhaps your looking for a unique wedding favor or party gift for your guests? How about sending each of them home with one of our adorable Porcelain Egg Candles! Revisions offers substantial price breaks on custom quantities based on your guest list.

Porcelain Egg Candles (set of 12) $48.50

Table Centerpieces & Place Settings

Incorporating special and unique elements into your wedding or party can make it all the more memorable. One of our clients was looking to create a flower stand to use on her round tables that wouldn't impede the view of her seated guest. To solve this problem, Revisions created an elegant silhouette from clear acrylic. The slot fit design is both modern yet elegant.

You can get your here: (clear acrylic flower stand, $30)

Some other ideas include our Silver Spoon Napkin Rings or perhaps a batch of our Porcelain Egg Sprouts to use as place name settings!

No matter your personal style, Revisions Design Studio can help make your event decor just right! Contact us today!


Wednesday, December 14, 2011

The Silver Lining Process!

   What better way to up-cycle and re purpose the treasured heirloom of family silver than creating wearable and usable items from these ornate utensils.  The history behind them is honored with their new function.  Having myself a set of prized "silver" in the family I am all to aware of how often it gets used and appreciated. The idea behind the Silver Lining line at Revisions Design Studio is to give value to an often forgotten item.
   That said, going from spoon to ring takes a number of steps not to mention swipes of the file. The following is a step by step summary of how our studio takes tableware from tarnished to terrific!

One of the many great things about the use of silverware in this application of household use and fashion, I feel, is the little amount of space and tools used to make such an adored product. The studio space shown in this picture is where each of the steps takes place! In the corner a board for patina, containers for files and the few other tools used in the process, the bottom left corner a table vice for cutting and most importantly on the edge of the table the bending tool which really makes it all happen.

The process begins simply, with a nice smelly bath in liver of sulfur for each handle.  This yellow liquid is brushed on as a patina which darkens the metals surface. 
    After the patina has had time to work its magic, usually it takes a while and often two coats are necessary for an even finish a quick rinse with warm water and the bending process begins.


   In making rings the utensil is left whole and only cut after measurements are estimated and ring size determined. I have learned all to many times that you can always take metal away but it is rather difficult and in the case of our spoon jewelry impossible to add metal back. 


    Gripped between the interchangeable front metal dye and the white plastic puzzle like piece, the spoon/fork handle is gradually bent and manipulated to fit the size required. Once properly adjusted excess metal is cut using a Dremmel tool and finishing touches begin.

   Sharp edges are filed down to create a smooth edge for the wearer. After filing the ring is bent to proper size and position buffed and cleaned using a rough scrubbing pad. Lastly the end product needs a light coat of jewelers wax applied using a soft cloth.  This last step not only protects the metal for wear and tear but also offers a smooth and shinny finish.
   Once  inspected and properly package the Silver Lining items are ready for purchase and to be sent home to our dear customers!

     Hoping this gives readers some insite and appreciation into the process involved in  creating these products! Wishing you Happy Holidays and safe travels!